Adobe InDesign plugin

Enhance every placed image: without leaving InDesign

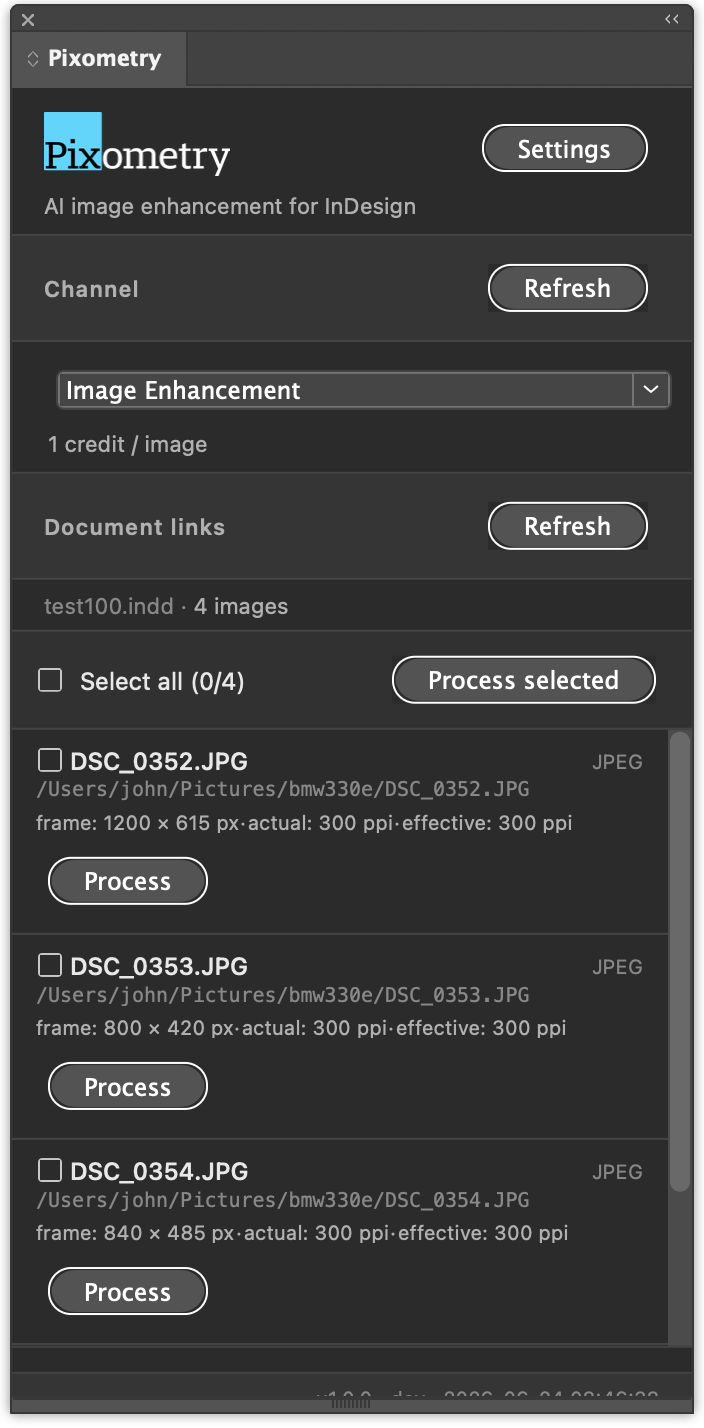
Click Process once. Pixometry enhances your images, removes backgrounds, upscales low-resolution sources, and relinks the result, all in the resolution and colour space your layout actually needs.

Free plugin. Adobe Creative Cloud subscription required. Uses your Pixometry Cloud credits per image processed.

Pixometry panel inside InDesign, showing a list of placed images ready for processing

Placed images take too long to prepare

Every image in an InDesign layout has its own story, the right resolution for the frame, the right crop for the layout, the right colour space for the print run. Manually preparing dozens or hundreds of images through Photoshop before you can start typesetting eats hours out of every project.

Pixometry does it for you, image-by-image, at the exact size and quality each frame needs. Nothing more, nothing less.

Place. Click. Done.

Three steps inside InDesign

No round-trips to Photoshop. No renaming, no folder juggling, no lost source files.

1

Place your images

Design your layout as you always do. Photos can be full-resolution originals. Pixometry only processes the region visible in each frame.

2

Pick a channel

The Pixometry panel lists your configured channels: image enhancement, background removal, upscaling, or your own custom recipe. One click per image, or select all.

3

Click Process

Images are enhanced in the cloud and relinked automatically. Your document instantly shows the processed result at the right resolution.

Built for the way you actually work

Four things that make Pixometry more than "just another export script."

Frame-aware cropping

Pixometry reads the geometric bounds of each frame in InDesign, maps them back to your source image's actual pixels, and processes only the visible region, at the DPI your layout was designed for.

A 24-megapixel source used in a 50 × 40 mm frame at 300 DPI comes out as a razor-sharp 591 × 472 px image, not the entire 24 MP that InDesign would otherwise carry around.

Source image
Frame in InDesign
Only visible pixels processed

Every image, one click

The panel lists every placed raster image in your document. Process one, process the batch, or reprocess just the ones you changed. The plugin tracks which frames have already been processed so you never redo work you didn't need to.

InDesign document with the Pixometry panel showing multiple images ready to process

Beyond enhancement

The same panel drives every Pixometry capability: background removal with pixel-accurate masks, AI upscaling for low-resolution sources, and full colour management for CMYK, AdobeRGB, sRGB and custom ICC profiles, all in a single workflow.

Sending web-sourced photography to print? Pixometry upscales small originals with detail intact, then converts to your target colour space in the same pass.

Image enhancement
Background removal
AI upscaling
Colour management

Non-destructive by default

Your source files are never touched. Processed results are saved alongside as new files, and a click on Show original instantly relinks back to the untouched source. Experiment freely.

Processed
Original

One click to switch, for every image, or just one.

Get started in three minutes

Free plugin, free trial account, try it on a real document before you commit.

Step 1

Install the plugin

Available on Adobe Exchange for InDesign 2024 and later, macOS and Windows. Free.

Adobe Exchange
Step 2

Create a Pixometry account

Sign up with your work email. You get 50 credits (about 50 processed images) to try things out, no card required.

Free account
Step 3

Connect the plugin

In your Pixometry Cloud dashboard, generate an API key. Paste it into the plugin's Settings tab. That's the whole setup.

Where to find the key

Publishing 1,000+ images a day?

Newspapers, magazines and catalogue publishers use Pixometry at scale: thousands of images per issue, custom channels per publication, and volume pricing that beats per-credit rates. Talk to us about an enterprise contract.

Contact sales